City Window Toolbars
Power and Services Tools
Map Tools
|
(Note: This page is quite large. It may take a few minutes to fully load.)
The City window contains three toolbars arranged by function--these are
your control centers for building, modifying and running your city. When
you choose a tool, your cursor will change into a representation of that
tool (along with an outline of the size of its placement), and the price
of its use will be displayed at the top-left of your city window, along
with its name.
For ease of use, especially for newcomers to 2KNet, you can simply click
on any button, then use the default setting of the tool. When you're ready
for more power, more features and more flexibility, you can make use of
the submenus that are hidden below many of the buttons. If you click and
hold on the submenu arrow next to the default button, the submenu will pop
up, allowing you to access many more choices and options.
The submenus--and their options--change over the years, reflecting the available
technology: for instance, you wouldn't see the nuclear fusion plant option
immediately available if you've begun your game in the year 1900.
The City toolbars contain tools that let you:
- Modify the landscape
- Zoom in and out for close-up and far-out views
- Center on different areas of the city in the City window
- Rotate the city in the City window
- Zone residential, commercial and industrial areas
- Build the city infrastructure
- Add special-purpose buildings (museums, zoos, etc.)
- Closely inspect city areas
- Add signs or markers
- Turn on and off the display of various objects and layers in the City
window
- Open various information windows
There's also has a Demand Indicator for various zones, located beneath the
City-Building tools, telling you that your district needs more of the displayed
zone.
These are the tools in the various City toolbars:
City-Building Tools
The City-Building tools let you build up (and tear down), zone and set up
the transportation network of your city. (You can also do some buyin', sellin'
and snoopin' on the side.)
Bulldozer Tools 
The Bulldozer is a multi-function multi-level tool, with a default setting
and a submenu to choose between four additional actions. Click and hold
on the Bulldozer arrow button to open the submenu. When the bulldozer is
active, the cursor will appear as a bulldozer.
To operate the bulldozer, choose the function you want, then click or click
and drag where you want to do your 'dozin'.
Demolish/Clear (the default) destroys and removes trees,
rubble, and man-made (Sim-made?) objects without affecting the terrain or
zoning status. Just click on anything to destroy it.
Cost: $1 per tile.
Level Terrain  lets you choose an altitude level and
slice off hills and mountains at your chosen height. Level also clears,
removing all trees, roads, power lines and buildings. lets you choose an altitude level and
slice off hills and mountains at your chosen height. Level also clears,
removing all trees, roads, power lines and buildings.
Cost: $25 per tile per altitude change.
Raise Terrain  lets you make mountains out of molehills. lets you make mountains out of molehills.
Cost: $25 per tile per altitude change.
Lower Terrain  lets you lower mountains and dig canyons.
(If you lower the terrain below sea level, it will fill with water.) lets you lower mountains and dig canyons.
(If you lower the terrain below sea level, it will fill with water.)
Cost: $25 per tile per altitude change.
De-Zone  lets you change undeveloped residential, commercial
or industrial zones to unzoned land. lets you change undeveloped residential, commercial
or industrial zones to unzoned land.
Cost: $1 per tile.
Raising, lowering and leveling terrain can be very expensive, so do it sparingly.
If you want to make a lot of changes to the landscape, do it in terrain-editing
mode before you start your city, or save up a lot of cash. (Only the server
player can edit terrain; see your Tutorial.)
Landscape Tools
The Landscape  tools let you add water and trees to your city. When
active, the cursor will appear as a water droplet. Clicking and holding
on the arrow next to the water droplet opens a submenu that allows you to
choose between trees and water. tools let you add water and trees to your city. When
active, the cursor will appear as a water droplet. Clicking and holding
on the arrow next to the water droplet opens a submenu that allows you to
choose between trees and water.
The Water tool lets you create lakes and streams by
clicking where you want your water to appear.
Cost: $100 per tile.
The Tree tool  lets you place trees onto the landscape.
Each click will place either one or two trees. You can click repeatedly
on a single tile to create dense thickets, and click and drag across many
tiles to create forests. lets you place trees onto the landscape.
Each click will place either one or two trees. You can click repeatedly
on a single tile to create dense thickets, and click and drag across many
tiles to create forests.
Cost: $3 per click.
Water System
The Water System tool  is a multi-use tool. Clicking and holding
on its arrow opens a submenu that allows you to choose between four different
water-related functions: buying storage tanks, installing water pumps, and
building treatment and desalinization plants (when available). When this
tool is active, the cursor appears as a water faucet. is a multi-use tool. Clicking and holding
on its arrow opens a submenu that allows you to choose between four different
water-related functions: buying storage tanks, installing water pumps, and
building treatment and desalinization plants (when available). When this
tool is active, the cursor appears as a water faucet.
Depending on the year and technology level in your city, you may only have
access to pumps and water towers. As time passes and inventions are invented,
the other options become available. A city can exist without a water system,
but population density will be limited. When the Sims build, they install
the underground water pipes for their buildings. Your only responsibility
is to hook the buildings up to the water system with your system tools.
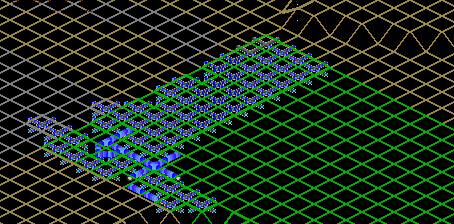 Going with the Flow (Underground View)
Water Towers lets you store precious water so you won't
have summer shortages in arid climates.
Cost: $250 per tower.
Water Pumps  when placed on land act as wells, a good source
of water. Water pumps need to be hooked to the power grid to function. When
pumps are placed right next to a lake or river, they supply twice as much
water as a well. A pump placed next to a coastline (salt water) only produces
as much water as a well. when placed on land act as wells, a good source
of water. Water pumps need to be hooked to the power grid to function. When
pumps are placed right next to a lake or river, they supply twice as much
water as a well. A pump placed next to a coastline (salt water) only produces
as much water as a well.
Cost: $100 per pump.
Treatment Plants  clean and recycle your city's water,
lessening seasonal shortages. clean and recycle your city's water,
lessening seasonal shortages.
Cost: $500 per treatment plant.
Desalinization Plants  remove the salt from sea water.
They are expensive, but sometimes necessary in beach communities with little
or no other source of water. Desalinization plants, which need power to
function, have internal pumps, and don't require extra water pumps. They
produce approximately twice as much water as a water pump next to a river. remove the salt from sea water.
They are expensive, but sometimes necessary in beach communities with little
or no other source of water. Desalinization plants, which need power to
function, have internal pumps, and don't require extra water pumps. They
produce approximately twice as much water as a water pump next to a river.
Cost: $1,000 per desalinization plant.
Road and Transport Tools
Clicking and holding on the Road  icon arrow opens a submenu
that allows you to choose between six different functions, most of them
road-related: placing roads and highways, train and subway tracks, and placing
power lines and the underground water pipe system. When this tool is active,
the cursor appears as a piece of paved road. icon arrow opens a submenu
that allows you to choose between six different functions, most of them
road-related: placing roads and highways, train and subway tracks, and placing
power lines and the underground water pipe system. When this tool is active,
the cursor appears as a piece of paved road.
Depending on the year and technology level of your city, you may only have
access to roads and tunnels. As time passes, the other options become available.
Road (the default setting) lets you "paint" your
roads onto the land by clicking in the place where you want the road to
start, dragging the cursor to the place you want the road to stop, and releasing
the mouse button. If you start laying a road and change your mind, you can
cancel the operation by holding down the Shift key before you release the
mouse button.
Roads can run in straight lines, 90-degree angles and 45-degree angles.
When roads cross, they form an intersection. If you lay a road across water
and it is possible to build a bridge, you will be told how much it will
cost. If a bridge can't be built, you will be notified.
Cost: $10 per road tile.
 On the Road
Wires  lets you lay power lines to put electricity into your
zones. When this tool is active, the cursor appears as a lightning bolt. lets you lay power lines to put electricity into your
zones. When this tool is active, the cursor appears as a lightning bolt.
Power lines blink warning lights to let you know if they're not hooked to
a power source. Power lines can only be run in straight lines and 90-degree
angles. They can cross roads or rails, but not on curved sections or straight
sections that run at 45 degrees. Laying power lines across water is a little
more expensive. If you lay power lines across water, a dialog box will open
and let you know how much it will cost.
Cost: $2 per tile across land, $10 per tile across water.
Rail  lets you "paint" your tracks onto the land
by clicking in the place where you want the rail to start, dragging the
cursor to the place where you want it to stop, and releasing the mouse button.
If you start laying a rail and change your mind, you can cancel the operation
by holding down the Shift key before you release the mouse button. Rails
are useless without rail depots. When this tool is active, the cursor appears
as a length of track. lets you "paint" your tracks onto the land
by clicking in the place where you want the rail to start, dragging the
cursor to the place where you want it to stop, and releasing the mouse button.
If you start laying a rail and change your mind, you can cancel the operation
by holding down the Shift key before you release the mouse button. Rails
are useless without rail depots. When this tool is active, the cursor appears
as a length of track.
Cost: $25 per tile.
Pipe  lets you "paint" your water pipes onto the
landscape by clicking in the place where you want the pipe to start, dragging
the cursor to the place you want the pipe to stop, and releasing the mouse
button. If you start laying a water pipe and change your mind, you can cancel
the operation by holding down the Shift key before you release the mouse
button. Water pipes are always laid underground. Activating Pipe automatically
turns on the underground view so you can see your pipes. lets you "paint" your water pipes onto the
landscape by clicking in the place where you want the pipe to start, dragging
the cursor to the place you want the pipe to stop, and releasing the mouse
button. If you start laying a water pipe and change your mind, you can cancel
the operation by holding down the Shift key before you release the mouse
button. Water pipes are always laid underground. Activating Pipe automatically
turns on the underground view so you can see your pipes.
Cost: $3 per tile.
Highway  is the tool to construct high-capacity roads
that are raised above the ground on pylons. They can handle four times as
many cars as regular roads. They are placed the same way as roads. You will
need to place onramps to allow cars to get on and off highways. When highways
cross, they form cloverleafs. If you lay a highway across water and it is
possible to build a bridge, you will be told how much it will cost. If a
bridge can't be built, you will be notified. is the tool to construct high-capacity roads
that are raised above the ground on pylons. They can handle four times as
many cars as regular roads. They are placed the same way as roads. You will
need to place onramps to allow cars to get on and off highways. When highways
cross, they form cloverleafs. If you lay a highway across water and it is
possible to build a bridge, you will be told how much it will cost. If a
bridge can't be built, you will be notified.
Cost: $100 per highway section (4 tiles).
Subways  are the means to construct an underground
rail system. The are placed in the same way as rails, but while looking
at the underground view. Subways are useless without subway stations. are the means to construct an underground
rail system. The are placed in the same way as rails, but while looking
at the underground view. Subways are useless without subway stations.
Cost: $100 per tile.
Tunnels and Junction Tools
Clicking and holding on the Tunnel  icon brings you to
a menu containing a number of transportation-related tools for making connections
in your roadway network. icon brings you to
a menu containing a number of transportation-related tools for making connections
in your roadway network.
Tunnels lets you make pathways for roads through hills
and mountains. Tunnels cannot curve, and you cannot cross tunnels, even
at different altitudes. To place a tunnel, click on the tile that you want
as your entrance point. The entrance point must be a sloped tile. Your highway
engineers won't try to build a tunnel where it's impossible to build, or
where it is unsafe, due to unstable terrain. If you pick a good spot, an
engineer's report will tell you how much the tunnel will cost and ask if
you want to go ahead or not.
Cost: $150 per tile of tunnel.
Rail Depots  allow commuters to get on and off trains.
Without depots, rails are useless. They must be placed on level ground,
and adjacent to tracks. allow commuters to get on and off trains.
Without depots, rails are useless. They must be placed on level ground,
and adjacent to tracks.
Cost: $500 per depot.
Onramps  allow cars and buses to travel back and forth
between roads and highways. Place them as junctions between roads and highways.
For best results, put onramps on both sides of a highway. allow cars and buses to travel back and forth
between roads and highways. Place them as junctions between roads and highways.
For best results, put onramps on both sides of a highway.
Cost: $25 per tile.
Bus Stops  allow commuters to take the bus to work and
help alleviate traffic. They must be placed on level ground. You will need
at least two bus depots, since buses travel between them. Passengers can
get on and off between depots. allow commuters to take the bus to work and
help alleviate traffic. They must be placed on level ground. You will need
at least two bus depots, since buses travel between them. Passengers can
get on and off between depots.
Cost: $250 per depot.
Subway Stations  allow passengers access to subway trains.
Subway trains only stop at stations. They must be placed on level ground,
adjacent to a subway line. It's usually easiest to place subway stations
while looking at the underground level. allow passengers access to subway trains.
Subway trains only stop at stations. They must be placed on level ground,
adjacent to a subway line. It's usually easiest to place subway stations
while looking at the underground level.
Cost: $250 per depot.
Sub <-> Rail  are junctions that allow you to
hook up your subways and above-ground rails for a continuous transit system.
They must be placed adjacent to a rail tile. are junctions that allow you to
hook up your subways and above-ground rails for a continuous transit system.
They must be placed adjacent to a rail tile.
Cost $250 per tile.
Zoning Tools 
The zoning tools are a set of eight tools that let you designate zone types
within your city, as well as place ports.
 Getting Zoned
Residential Zones
The Residential Zone tools let you, as commissioner, designate areas of
your city as places where people live. Clicking and holding on the zoning
submenu arrow opens a submenu that lets you choose whether the zones will
be Light Residential or Dense Residential  . When this tool is active, the cursor will appear as a little house. . When this tool is active, the cursor will appear as a little house.
To zone an area as residential, click and hold on the terrain, drag the
mouse, creating a rectangle, then release the mouse button. If you start
laying down a zone line and change your mind, you can cancel the operation
by holding down the Shift key before you release the mouse button. If you
zone residential over an area that includes some tiles that are already
the same density residential, you will not be charged for zoning those tiles.
If you zone over an undeveloped area that is already commercial, industrial
or a different density residential, it will be rezoned and you will be charged.
You cannot rezone an area that is already developed.
Cost: Light Residential $5 per tile, Dense Residential $10 per tile.
Commercial Zones
The Commercial Zone tools let you, as mayor, designate areas of your city
as places where people build stores, offices and other places of commerce.
You can choose between Light Commercial  or Dense Commercial or Dense Commercial
 . When this tool is active, the cursor will appear as a little office
building. . When this tool is active, the cursor will appear as a little office
building.
To zone an area as commercial, click and hold on the terrain, then drag
the mouse, creating a rectangle, then release the mouse button. If you start
laying down a zone line and change your mind, you can cancel the operation
by holding down the Shift key before you release the mouse button. If you
zone commercial over an area that includes some tiles that are already the
same density commercial, you will not be charged for rezoning those tiles.
If you zone commercial over an undeveloped area that is already residential,
industrial or a different density commercial, it will be rezoned and you
will be charged. You cannot rezone an area that is already developed.
Cost: Light Commercial $5 per tile, Dense Commercial $10 per tile.
Industrial Zones
The Industrial Zone tool lets you, as mayor, designate areas of your city
as places where people build factories. You can choose between Light
Industrial  and Dense Industrial . When this tool
is active, the cursor will appear as a little factory. and Dense Industrial . When this tool
is active, the cursor will appear as a little factory.
To zone an area as industrial, click and hold on the terrain, then drag
the mouse, creating a rectangle, then release the mouse button. If you start
placing a zone and change your mind, you can cancel the operation by holding
down the Shift key before you release the mouse button. If you zone industrial
over an area that includes some tiles that are already the same density
industrial, you will not be charged for rezoning those tiles. If you zone
industrial over an undeveloped area that is already commercial, residential
or a different density industrial, it will be rezoned and you will be charged.
You cannot rezone an area that is already developed.
Cost: Light Industrial $5 per tile, Dense Industrial $10 per tile.
This is how most municipal planning and zoning systems are supposed to work:
When meaningful changes to a city's makeup are suggested, planners select
options for review and assemble reports for discussion. If these discussions
become controversial, the reports are analyzed by elected (political) officials
and a decision is made, in theory, based upon a thorough study of options,
facts and findings. At least that's how the theory goes.
Ports
You can place two types of ports in 2KNet: Seaports  and Airports and Airports
 . When this tool is active, the cursor will appear as an anchor and
radar dish. . When this tool is active, the cursor will appear as an anchor and
radar dish.
Ports are placed by clicking and dragging to form a square or rectangle,
then releasing the mouse button. If you start placing a port and change
your mind, you can cancel the operation by holding down the Shift key before
you release the mouse button. Ports must be powered before they will develop.
Seaports must be on a shoreline to be of any use.
Cost: $150 per Seaport tile, $250 per Airport tile.
Land and Info Tools
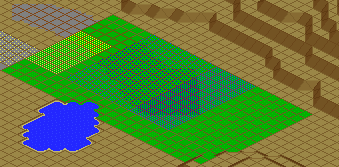
Buy Land  lets you designate what terrain you want to
own and develop in the game. You can't use any city-building tools on land
that you don't own. Select the Buy Land tool and then click and drag the
cursor (as with other "painting" tools) over the desired territory
with your mouse button down. Release the mouse when the land you want is
highlighted. Your newly purchased land will initially be white, but when
it's yours to build on, it will turn a lovely shade of green. (The confirmation
of your land purchase--that green goodness--can take a little time, so be
patient.) lets you designate what terrain you want to
own and develop in the game. You can't use any city-building tools on land
that you don't own. Select the Buy Land tool and then click and drag the
cursor (as with other "painting" tools) over the desired territory
with your mouse button down. Release the mouse when the land you want is
highlighted. Your newly purchased land will initially be white, but when
it's yours to build on, it will turn a lovely shade of green. (The confirmation
of your land purchase--that green goodness--can take a little time, so be
patient.)
You can cancel the operation by holding down the Shift key before you release
the mouse button. Your purchased land will be seen as gray areas by opposing
players.
Sell Land  works the same as Buy Land, though after you've
painted over the land you want to sell, it will return to its original color
before purchase. It will then be available for others to purchase, and its
sale price will be added to your funds. All buildings on sold land will
be removed. works the same as Buy Land, though after you've
painted over the land you want to sell, it will return to its original color
before purchase. It will then be available for others to purchase, and its
sale price will be added to your funds. All buildings on sold land will
be removed.
Sign  lets you label streets, buildings and points
of interest in your city. When this tool is active, the cursor will appear
as a little sign. To make a sign, activate the Sign tool and click on the
place where you want it to appear. When the dialog box opens, type in the
words you want the sign to say, then click DONE. There is no cost for placing
signs. lets you label streets, buildings and points
of interest in your city. When this tool is active, the cursor will appear
as a little sign. To make a sign, activate the Sign tool and click on the
place where you want it to appear. When the dialog box opens, type in the
words you want the sign to say, then click DONE. There is no cost for placing
signs.
The display of your signs can be turned on and off with the Display Signs
button in the Map tools.
Query  is a tool for closely inspecting different parts of
your city. When this tool is active, the cursor appears as a magnifying
glass. To get information, activate the tool, then click anywhere. A dialog
box will open, and display fascinating facts about the spot where you clicked. is a tool for closely inspecting different parts of
your city. When this tool is active, the cursor appears as a magnifying
glass. To get information, activate the tool, then click anywhere. A dialog
box will open, and display fascinating facts about the spot where you clicked.
Once you have viewed the dialog box, you can click on the OK button to make
it go away. Sometimes the Query dialog box allows you to rename buildings
(like stadiums). Click on RENAME if you want to change the name of the queried
building. There is no cost to use the Query tool.
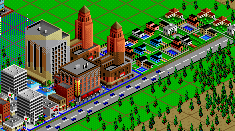
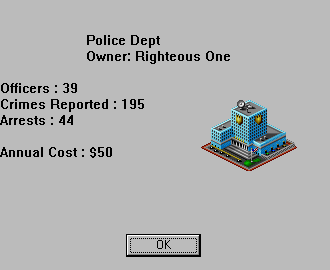 The Query Window at Work
Power and Services Toolbar

The Power Plant  tools let you choose power sources for
your city. Depending on the year and the technology level of your city,
there may be from three to nine types of power plants available. Click on
the power source you want, then click on the terrain where you want it to
go. The power possibilities are: tools let you choose power sources for
your city. Depending on the year and the technology level of your city,
there may be from three to nine types of power plants available. Click on
the power source you want, then click on the terrain where you want it to
go. The power possibilities are:
Coal Plant -- $4,000
 Hydroelectric Plant -- $400 Hydroelectric Plant -- $400
 Oil Plant -- $6,600 Oil Plant -- $6,600
 Gas Plant -- $2,000 Gas Plant -- $2,000
 Nuclear Plant -- $15,000 Nuclear Plant -- $15,000
 Windmill -- $100 Windmill -- $100
 Solar Plant -- $1,300 Solar Plant -- $1,300
 Microwave Plant -- $28,000 Microwave Plant -- $28,000
 Fusion Plant -- $40,000 Fusion Plant -- $40,000
See the Inside the Simulation page
for some particulars about power.
City Services 
City Services is a multi-function tool that lets you provide your city with
those necessities of life that we all wish weren't necessary. Click and
hold on the City Services button arrow to open a submenu with the following
unpleasant choices: Police, Fire Station,  Hospital Hospital  and Prison and Prison  . When this tool
is active, the cursor will appear as a badge. . When this tool
is active, the cursor will appear as a badge.
Cost: $500 per police station, $500 per fire station, $500 per hospital,
$3,000 per prison.
Education 
Education is a multi-function tool that lets you provide your citizens with
everything they need to improve their minds. Click and hold on the Education
button arrow to open a submenu with the following smart choices: School,
College,  Library Library  and Museum and Museum
 . When this tool is active, the cursor will appear as a mortarboard. . When this tool is active, the cursor will appear as a mortarboard.
Cost: $250 per school, $1,000 per college, $500 per library, $1,000 per
museum.
Recreation 
Recreation is a multi-function tool that lets you provide your citizens
with places to have a little rest, relaxation and plain old fun. Click and
hold on the Recreation button arrow to open a submenu with the following
exciting choices: Small Park, Large Park,  Zoo, Zoo,  Stadium, Stadium,  and
Marina and
Marina  . When this tool is active, the cursor will appear as
a bunch of balloons! . When this tool is active, the cursor will appear as
a bunch of balloons!
Cost: $20 per small park, $150 per large park, $3,000 per zoo, $5,000 per
stadium, $1,000 per marina.
Rewards 
This button is like a surprise package. It will be unavailable until you
deserve a reward. Rewards are based on your city's population, and consist
of special buildings and monuments to your commissioner's prowess. When
this tool is active, the cursor appears as a city commissioner tipping his
hat.
The rewards you can strive to gain are ... no, I won't tell you. You'll
just have to wait and see for yourself.
Map Tools

These tools are for navigation and viewing purposes around your city map.
They are located below the Main menu.
Rotate Clockwise 
Click on this button to rotate the entire city limits 90 degrees clockwise.
There is no cost for rotating.
Rotate Counter-Clockwise 
Click on this button to rotate the entire city limits 90 degrees counter-clockwise.
There is no cost for rotating.
Zoom In 
Click here to zoom in for an enlarged, closer view in the City window. There
are three zoom levels. There is no cost for zooming.
Zoom Out 
Click here to zoom out for a smaller, farther-out view in the City window.
There are three zoom levels. There is no cost for zooming, in or out.
Center 
The Center tool lets you pick a place in your city to be centered in the
City window. Just activate the tool and click anywhere in the city. When
Center is active, the cursor will appear as a target sight. There is no
cost for centering. You can also click with the right mouse button in the
spot where you want your window centered. New games default to the Center
tool.
Show Underground 
Click here to toggle between the surface and the underground displays. If
you've developed your underground network, you'll see the subway and water-delivery
systems you've put in place.
Show Zones 
This button works differently depending on whether you're looking at the
normal or underground view. In the normal view, clicking here toggles on
and off the display of all buildings in zones. It doesn't affect city-owned
buildings like police and fire stations, educational facilities, depots
or power plants, but does include ports. In underground view, it toggles
on and off a color display that lets you know where your zones are without
jumping back upstairs.
Show Signs
Click here to toggle on and off the display of all signs you've placed in
your district. The signs will be invisible until you turn them back on.
Show Buildings 
This tool works much like the Show Zones tool, in that clicking on it will
remove all of your infrastructure from view, revealing the land underneath,
though without the grid demarcations of the various buildings that the Show
Zones tool does. Basically, land you own is green, land owned by others
is gray, with some zoning shading. Click again to return the city to normal
view.
Show Infrastructure
Click here to toggle on and off the display of all miscellaneous city infrastructure
items in the City window (roads, rails, subway lines, power lines, water
pumps and subway stations).
|
(C)1996, Maxis, Inc.
|